Hello and welcome back.
In part I, we learned the theory behind the html div tag and the form elements.
We have quiet some coding to do in this part, so let's get to it.
Create a new html file and name it sections.html. Open the file in your text editor (e.g. Sublime Text), type in the following code and save it. You can go ahead and view it on your browser afterwards, though it won't look quiet good just yet.
<!DOCTYPE html>
<html>
<head>
<title></title>
<link rel="stylesheet" type="text/css" href="sections.css">
</head>
<body>
<div id="header">
<h2>My Site</h2>
</div>
<div id="content">
<div id="main">
<p>Welcome to my website.<br>Please give me your feedback using the form on the side bar</p>
</div>
<div id="rightSideBar">
<form>
<input type="text" name="username_input" placeholder="Enter your username">
<textarea placeholder="enter your feedback"></textarea>
<button>SUBMIT FEEDBACK</button>
</form>
</div>
</div>
<div id="footer">
<h4>Contact Us</h4>
<ul>
<li>+861 000 000 000</li>
<li>myemail@mysite.com</li>
</ul>
</div>
</body>
</html>
Let's examine this code.
Right after the opening tag, we create a division (or section) using the div tags <div> and </div>.
We give this division the id 'header'.
Inside this header division, we add only one element, the heading 'my site'.
Then we create another division. This we id as content.
The content division itself is divided into 2 sections. The main div and the rightSideBar div.
Inside the main div, we have a single paragraph that welcomes our users.
The <br> tag is used to create a new line. To see the difference. go ahead and remove the <br>, save and open the file in your browser. Then go back, add the <br>, save and again view the file in your browser.
Inside the right side bar, we have a form. This shall be used to get information from the user/visitor of our site.
The form opens with a <form> tag and is closed by the </form> tag.
The footer has some contact information displayed using a small heading and an unordered list.
Great!
The site does not look that good in a browser. Let's fix that quickly.
See the linked sectons.css file in the html head section below the title?
Go ahead and create a new file, name it sections.css and save it in the same folder location where you have saved this sections.html file.
Open it in Sublime Text and type in the following CSS code.
#header{
background-color: grey;
padding-top: 5px;
padding-bottom: 5px;
padding-left: 15px;
}
h2{
margin: 0px;
color: white;
}
#content{
padding-left: 15px;
}
p{
display: inline-block;
float: left;
margin-right: 50px;
}
form{
display: inline-block;
border-left: 2px solid grey;
padding: 12px;
}
input{
display: block;
margin-bottom: 24px;
width: 200px;
padding: 8px;
}
textarea{
display: block;
margin-bottom: 24px;
width: 214px;
text-align: left;
}
button{
width: 214px;
padding: 8px;
}
#footer{
background-color: grey;
padding: 15px;
color: white;
}
ul{
list-style: none;
}
Save it. Open sections.htmk in your browser.
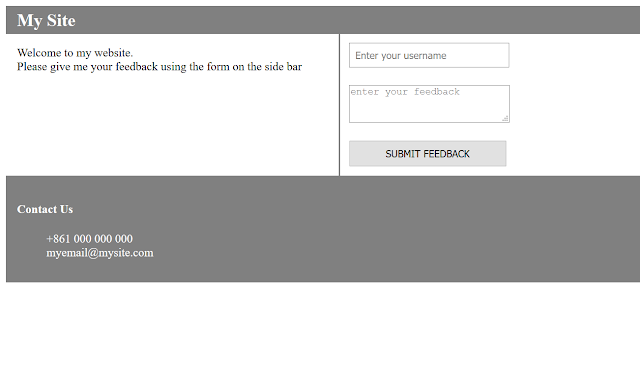
It should look similar (if not exact) to the following image:
That's better.
It's okay that you are not yet familiar with some of the css code you have just typed. We shall discuss those next.
For now, I hope you understood the concept of divisions and forms.
Oh, and nothing happens when you fill in the form and click the button. Just know that working on data provided through forms, is the task of back-end developers. You are a front end developer (Your concern is on what the user sees!).
On that note, happy coding.
Try changing the <input> element type from text to password and see (in your browser) what happens :)
In part I, we learned the theory behind the html div tag and the form elements.
We have quiet some coding to do in this part, so let's get to it.
Create a new html file and name it sections.html. Open the file in your text editor (e.g. Sublime Text), type in the following code and save it. You can go ahead and view it on your browser afterwards, though it won't look quiet good just yet.
<!DOCTYPE html>
<html>
<head>
<title></title>
<link rel="stylesheet" type="text/css" href="sections.css">
</head>
<body>
<div id="header">
<h2>My Site</h2>
</div>
<div id="content">
<div id="main">
<p>Welcome to my website.<br>Please give me your feedback using the form on the side bar</p>
</div>
<div id="rightSideBar">
<form>
<input type="text" name="username_input" placeholder="Enter your username">
<textarea placeholder="enter your feedback"></textarea>
<button>SUBMIT FEEDBACK</button>
</form>
</div>
</div>
<div id="footer">
<h4>Contact Us</h4>
<ul>
<li>+861 000 000 000</li>
<li>myemail@mysite.com</li>
</ul>
</div>
</body>
</html>
Let's examine this code.
Right after the opening tag, we create a division (or section) using the div tags <div> and </div>.
We give this division the id 'header'.
Inside this header division, we add only one element, the heading 'my site'.
Then we create another division. This we id as content.
The content division itself is divided into 2 sections. The main div and the rightSideBar div.
Inside the main div, we have a single paragraph that welcomes our users.
The <br> tag is used to create a new line. To see the difference. go ahead and remove the <br>, save and open the file in your browser. Then go back, add the <br>, save and again view the file in your browser.
Inside the right side bar, we have a form. This shall be used to get information from the user/visitor of our site.
The form opens with a <form> tag and is closed by the </form> tag.
- The first element inside the form is the input.
- The input we specify is of type 'text'. This means the user will be able to type in visible letters, numbers and characters.
- This input also has a placeholder. A placeholder is used in form elements to guide the user on what to write. When the user starts typing inside the input (try this), the placeholder disappears.
- Next a textarea is specified, also with a placeholder, explaining that the user should type their feedback here.
- Last in the form, we have a button. This shall be clicked when the user is done filling the information.
The footer has some contact information displayed using a small heading and an unordered list.
Great!
The site does not look that good in a browser. Let's fix that quickly.
See the linked sectons.css file in the html head section below the title?
Go ahead and create a new file, name it sections.css and save it in the same folder location where you have saved this sections.html file.
Open it in Sublime Text and type in the following CSS code.
#header{
background-color: grey;
padding-top: 5px;
padding-bottom: 5px;
padding-left: 15px;
}
h2{
margin: 0px;
color: white;
}
#content{
padding-left: 15px;
}
p{
display: inline-block;
float: left;
margin-right: 50px;
}
form{
display: inline-block;
border-left: 2px solid grey;
padding: 12px;
}
input{
display: block;
margin-bottom: 24px;
width: 200px;
padding: 8px;
}
textarea{
display: block;
margin-bottom: 24px;
width: 214px;
text-align: left;
}
button{
width: 214px;
padding: 8px;
}
#footer{
background-color: grey;
padding: 15px;
color: white;
}
ul{
list-style: none;
}
Save it. Open sections.htmk in your browser.
It should look similar (if not exact) to the following image:

That's better.
It's okay that you are not yet familiar with some of the css code you have just typed. We shall discuss those next.
For now, I hope you understood the concept of divisions and forms.
Oh, and nothing happens when you fill in the form and click the button. Just know that working on data provided through forms, is the task of back-end developers. You are a front end developer (Your concern is on what the user sees!).
On that note, happy coding.
Try changing the <input> element type from text to password and see (in your browser) what happens :)
Comments
Post a Comment